Search for how to make a Halloween yard sign and every result assumes you are building one out of wood. Cut the plank, sand it, paint it, seal it with polycrylic, attach a stake. It is good advice for a wooden sign and completely useless if what you actually have is a printed one.
This is the other guide. You printed a sign, or you are about to. Here is how to get it out onto the lawn in a state that survives until the 31st.
Paper Is The Problem, Not The Design
A sheet of printed cardstock in a front yard has four enemies, and they arrive in this order.
Rain, within days. Untreated paper wicks water, swells, and the ink runs. Cardstock buys you a few hours, not a season.
Dew, every single night. This is the one people miss. Even in a dry October, overnight condensation soaks anything unprotected, and the sign is wet by 6am whether or not it rained.
Wind, which is less about the sign and more about the mount. A stiff sign on a weak stake becomes a sail and ends up in a neighbor’s hedge.
UV, over weeks. Sunlight fades ink steadily through October. This is the slowest enemy and the one that decides whether your sign looks deliberate or tired by Halloween night.
Solve all four and a paper sign genuinely lasts a month. Solve three and it does not.
Design does matter for one kind of sign: the one that tells people something, like where the candy is, which bowl is food-free or that there are flashing lights ahead. Dripping and scratchy Halloween fonts are exactly what the US Access Board’s sign guide rules out when it prohibits “italic, oblique, script, highly decorative or other unusual forms.” Our guide to an accessible trick-or-treat covers letter height, contrast and what to put on it.
Three Ways To Weatherproof A Printed Sign
In ascending order of effort and durability.
1. The sheet protector (about 15 minutes, lasts a week or two)
Slide the printed sheet into a heavy sheet protector and tape the open end shut. It is nearly free and it is fine for a covered porch.
In an open yard it fails at the seams. Water finds the tape, gets between the plastic and the paper, and then sits there. A sealed pocket with water inside it is worse than no pocket at all.
Use this for a porch or an entryway with an overhang. Do not use it on a lawn.
2. Lamination (about an hour, lasts the season)
This is the right answer for most people. A thermal laminator bonds plastic to both faces of the sheet, and the result is genuinely waterproof rather than water resistant.
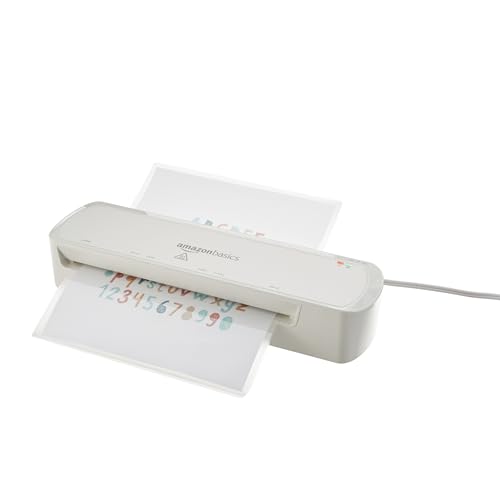
Amazon Basics 9-Inch Thermal Laminator Machine
Nine inches wide, which takes letter-size sheets with room for a sealed border. Two heat settings so you can run 3 mil or 5 mil pouches, and a jam release for when you inevitably feed one in crooked.
Use 5 mil pouches rather than the 3 mil ones that ship with most machines. The extra thickness matters here for stiffness as much as waterproofing. A 3 mil sign flaps in wind; a 5 mil sign holds its shape.

Staples Thermal Laminating Pouches, Letter Size, 5 Mil, 100-Pack
A hundred letter-size 5 mil pouches for under twenty dollars, which is enough for every sign you will ever print plus the ones you redo. Works with any consumer laminator.
3. Mount to coroplast and seal (about two hours, lasts years)
Lamination plus a rigid backing is what commercial yard signs actually are. Covered below, because the mounting is the part that keeps it standing.
The Lamination Mistake That Ruins Signs
Here is the thing nobody tells you, and it ruins more laminated signs than anything else.
Do not trim a laminated sign to the edge of the artwork.
The lamination is waterproof across its faces but wide open at any cut edge. Trim flush to the paper and you have exposed the paper’s edge all the way around. Water wicks in from that edge by capillary action, spreads between the plastic and the paper, and now it is sealed inside with nowhere to evaporate. The sign goes cloudy, then the ink blooms, and it looks worse than an unprotected sign would have.
Leave at least a quarter inch of clear laminate all the way around, so the plastic seals to itself in an unbroken border. If you must trim, trim outside that margin.
Same principle applies to punching a hole for a hanger. A hole through a laminated sign is a hole in the waterproofing. Punch it before laminating and let the plastic seal through it, or mount the sign without holes.
Mounting: Coroplast And H-Stakes
The sign is waterproof. Now it has to stand up in wind for a month.
Corrugated plastic, often called coroplast, is what every real estate and campaign sign in your neighborhood is made of. It is stiff, it is genuinely weatherproof, and it cuts with a utility knife and a straight edge.

Coroplast Blank Yard Signs, 4mm, 18 x 24 inch, 7-Pack
Seven 18 by 24 inch blanks in assorted colors. One sheet cuts down into two or three sign backers, so a pack covers a full yard display with spares.
Cut a backer slightly larger than your laminated sign and attach with double-sided outdoor tape or a few dabs of clear silicone. Silicone stays flexible in cold weather where hot glue goes brittle and lets go.
One detail worth knowing: coroplast has a grain. The internal flutes run one direction, and the sheet is far stiffer across them than along them. Cut so the flutes run vertically, matching the stake legs. Get it backwards and the sign folds over in the first real wind.

Heavy Duty H-Frame Wire Yard Sign Stakes, 12-Pack
Nine gauge galvanized H-stakes sized for 4mm coroplast. The two legs slide straight into the flutes, which is why coroplast and H-stakes are the standard pairing rather than two separate decisions.
The H-stake legs push into the coroplast flutes directly. No screws, no brackets. Push the stake into soft ground rather than hammering it, since hammering the wire bends it.
For hard or frozen ground, water the spot an hour beforehand. A stake driven into dry clay bends before it sinks.
UV Is The Slow Killer
Your sign will not fail dramatically from sunlight. It will just quietly get worse, and you will not notice because you see it every day.
Lamination offers almost no UV protection on its own. If the sign sits in direct afternoon sun, add a UV-resistant clear coat over the finished lamination.

Krylon Gallery Series UV-Resistant Clear Coating, Matte, 11 oz
Non-yellowing UV-resistant acrylic in a matte finish, which also kills the glare that makes glossy laminated signs unreadable in daylight. Two light coats, not one heavy one.
Matte is the right choice for a second reason. A glossy laminated sign in direct sun is a mirror, and a sign nobody can read from the sidewalk is not doing its job.
Two practical notes on fade. Black and dark text survives far better than colored ink, which is one reason our sign printables are high-contrast rather than colorful. And if you are running a display from the first of October, budget on reprinting anything in full sun around the 20th. The reprint costs pennies.
What It Costs
| Build | Components | Cost | Lasts |
|---|---|---|---|
| Porch only | Sheet protectors and tape | ~$8 | A week or two, under cover |
| The one we recommend | Laminator and 5 mil pouches | ~$45 | The season |
| Full yard display | Above plus coroplast, stakes, UV coat | ~$93 | Years, reusing everything but the paper |
The laminator is the item people hesitate over and should not. It is under thirty dollars, it is the difference between signs that last a week and signs that last the season, and it does school projects and recipe cards for the rest of the year.
A Realistic October Timeline
- Late September. Print and laminate everything indoors, in one session. It is a bad job to do in a hurry in the cold.
- First week of October. Cut backers, mount, and stake. Put the signs out.
- Around the 20th. Walk the display in daylight and look at it honestly. Reprint anything faded and re-seat any stake that has worked loose.
- The 30th. Push every stake back down. A month of rain and freeze cycles lifts them more than you would expect.
- November 1st. Pull the signs, wipe them dry, and store them flat. A laminated sign stored flat and dry comes out fine next year. One stored damp in a bin does not.
Frequently Asked Questions
Can I just use a sheet protector? On a covered porch, yes. On an open lawn, no. Water gets in at the taped seam and then cannot get out, which is worse than leaving the sign bare.
What paper should I print on? Cardstock around 65 to 110 lb. Regular copy paper works if you are laminating, since the plastic provides the stiffness, but cardstock handles better and resists creasing while you work.
Matte or glossy lamination? Glossy is more waterproof at the surface and more readable indoors. Outdoors, glossy reflects daylight badly. Laminate glossy if that is what you have, then knock the shine back with a matte UV coat.
How do I stop signs blowing over? Coroplast with the flutes running vertically, H-stakes pushed fully into soft ground, and a stake at each end of anything wider than about 18 inches. Most blow-overs are a flute-direction mistake, not a wind problem.
Will laminating work with an inkjet print? Yes, but let it dry fully first. Inkjet ink that is still curing can offset onto the laminate under heat. Give it a few hours, or overnight for heavy coverage.
How many seasons will these last? The coroplast and stakes last for years. The laminated paper realistically lasts one season in full sun and two or three in shade. Since the paper is the free part, that is the right thing to be replacing.
Related Resources
All four of our sign sets are free to print and sized for this process: beware signs, door signs, enter if you dare signs, and yard haunt warning signs. The Coven Spell Book Page, the witches’ chant from Macbeth, laminates the same way for a lectern beside a witch coven scene.
For the rest of the outdoor display, see our yard haunt basics guide and weatherproof Halloween decorations, which covers anchoring, power, and cord safety for everything that is not a sign. The outdoor decorating guide covers composition and sightlines from the street.